Archive | Daily Living RSS feed for this section

Easy & Fluffy Banana Pancakes!

20 Jun

Banana Pancakes

Bananas….. the taste of bananas are almost a memory of yesterday!!!  With the terribly insane prices of bananas these days ($12.98 per kg!  Which gets you about 5 bananas), one can only hope that the prices will soon drop, so we can go back to eating them! By the way, bananas are actually a herb and not a fruit! Interesting huh!!!

Anyway, weeks ago, I made these banana pancakes.  Boy, were they good!  I was looking for a easy and quick yet fluffy pancake recipe.  I have tried numerous pancakes recipes that require buttermilk or using the handheld beater/whisk, which although turn out good, I wanted something easy.  A recipe that I could use on the spur of the moment with the basic ingredients in my pantry that required minimal dishes.

Here we go!  I found a recipe by Bonnie Mo.  She calls her recipe “The Best Banana Pancake Recipe Ever”

Do give it a go!  I reckon it does deserve the title! 🙂

Ingredients:

4 tbsp. unsalted butter, plus additional for greasing the pan

1½ cups all-purpose flour

2 tbsp. sugar

2½ tsp. baking powder

¼ tsp. salt

1 small ripe banana, mashed

1 cup milk

2 large eggs

½ tsp. vanilla extract

Additional banana slices, for serving

Maple syrup, whipped cream, etc. for serving

Directions:

Preheat the oven to 200˚ F.  Melt the butter in a microwave safe bowl; set aside to cool slightly.  In a medium bowl, combine the flour, sugar, baking powder and salt; whisk together to combine.  In a another bowl, combine the mashed banana, milk, eggs and vanilla and whisk to blend.  Add the melted butter and the banana mixture to the bowl with the dry ingredients and mix gently with a rubber spatula until just blended (the batter will be slightly lumpy).

Heat a skillet or griddle over medium heat.  Grease lightly with butter.  Drop the batter in 1/3 cup portions onto the heated cooking surface.  Cook until a few bubbles form in the top surface and the bottom is golden brown, about 2 minutes.  Carefully flip the pancake over and cook on the remaining side until golden brown, 1-2 minutes more.  Transfer finished pancakes to a plate in the warm oven while you use the remaining batter, re-greasing the pan as needed.  Serve warm with maple syrup and sliced bananas as desired.

makes about 8 pancakes

Holiday Shoes

5 Jun

Easy Steps - Harmony

During my Melbourne trip last weekend, I bought shoes.  Yes shoes.  Nothing fancy.  Just normal essential footware.  However, these were blog-worthy shoes!  (No, my pair was the simple if a bit boring black suede ones, not the animal print ones!!!)

Wearing these shoes made me feel like I was on holiday.  On Wednesday, when I first wore them, and as Mr A. and I walked to the train station, I declared:

“These shoes are fantastic!  I feel like I’m on holiday when I wear them!”

To which Mr A’s reply was:  “Great! Buy more!  They are much cheaper than going on a holiday!”

*scowls*  What type of answer was that!  Wrong answer!!! 🙂

However, really, I love my Easy Steps shoes.  Sure, they are no Jimmy Choo shoes or fantastic fabulous shoes with the red bottoms (I forget the name!), but when you choose a pair of footware that you need for essential everyday living, you want a comfortable pair, that looks nice, but that allows you to walk without being in pain and describing you have a foot full of blisters by the end of the day!  They have a lovely soft padding that makes your feet so comfortable (hence the holiday feel!).  It’s just so good!!!  So I highly HIGHLY recommend this brand of shoes.  I have bought several pairs of Easy Steps over the years, and trust me, they never fail, and are always a joy to wear!  I wear them till they are in such a sorry state that I have to discard them.

To my delight, in recent seasons, they have actually started to make them look more pretty and trendy and not shoes that look like what the older generation might wear.  At a full price of $119.95 (and they are always at least 30-40% off several times a year!), they are worth every cent.

I now wish I bought 2 pairs!!!

Hope all of us in Western Australia are enjoying our own mini holiday now – this long weekend! 🙂

Crispy Roast Pork Belly (“Siu Yoke”)

1 May

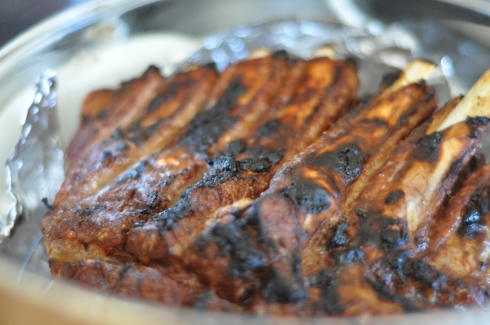
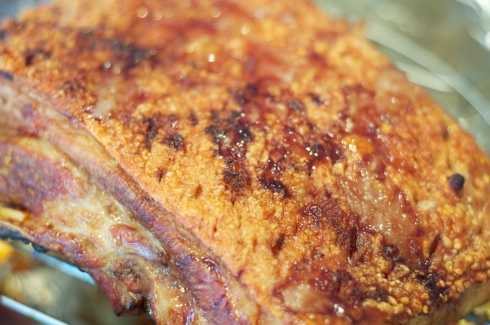
Crispy, mouth watering pork belly! Delicious!!!

Hello there! 🙂  It has been so long!!! 🙂 I do miss blogging (but have been rather lazy lately! 😛  If only I could blog from my head and somehow it just appears on wordpress! :))

Look at these juicy and yet not too fatty pieces of crispy roast pork belly! 🙂  Yummy!  This was my first time making it, thanks to the convection oven given by The Memoir for my birthday.  This recipe also is from The Memoir – check out her blog post for more detailed pictures (she is much better at taking pictures than me.  I am too lazy to even edit my pictures – I snap a few and go thats it!  So all my photos are unedited and very very raw!  ST gave me a really quick lesson over coffee and chocolate at Koko Black, I still have a long way to go…. hahaha.  I’m not patient enough to learn what all the buttons mean and do!  Perhaps one day!)

Anyway back to the delicious crispy roast pork belly, or better known among the asians as “Siu Yoke”.  For weeks I have been trying to find a nice slab of pork belly to try this recipe after seeing it on The Memoir’s blog!  Buying such a nice decent piece of meat is not readily available at Coles and Woolies – however I stumbled upon it when I was at Coles (Claremont Quarter) one Friday night! Yay!!! Much much to my delight!  I picked it up and immediately bought it!  Finally! Crispy roast pork, here I come! 🙂  I was very delighted to find that it was not full of fat – there was a lot of meat in it!  It did not end up being dry either!

After researching and comparing various recipes on the internet, with so many methods and theories on the crackle and how to get it crispy etc etc, I decided The Memoir’s was the best.  Simple, delicious and straight forward!  Have a go – you won’t regret it!

Crispy Roast Pork Belly 

(Adapted from The Memoir’s Recipe)

Ingredients:

2 kg pork belly (with skin on)
1.5 tbsp sea salt (I just used normal cooking salt as I didnt have any sea salt)
3 tbsp white vinegar (I didn’t have any white vinegar, so I used my japanese rice vinegar! Was just fine! You couldn’t tell the difference.  I read the vinegar is mainly to assist with the crackling rather than actual flavour)

Marinade:

1.5 tbsp salt
1.5 tbsp sugar (I used raw brown sugar)
3.5 pieces red fermented bean curd (nam yue) – I love this stuff! I can never resist adding a little more in!
1 tbsp five spice powder
1.5 tbsp chopped garlic (because I used my pestle and mortar – I didnt need to chop the garlic up – see method below)

Method:

  1. Wash the pork belly and pat dry with disposable kitchen towels. Ensure that the meat is dried thoroughly as you need it to dry to get a nice crackle.
  2. On the meat side, score it diagonally and horizontally.  As the slab of meat I bought had bones in it, it was a little tricky.  Just dry to score it as well as you can if that’s the case.  Make sure it is scored deep enough but do not pierce through to the skin side.
  3. Prick the skin side with holes.  I used my knife to do so.  This sounds terrible, but you really have to just poke it really hard.  I was really surprised at how hard it was.  I felt so sorry to be doing this to the piggy… it was horrible to have to stab it so many times.  But yes the skin is really tough so you just have to keep poking it with the sharp knife.  Do this to get good crackle – so make sure you poke it all over.

4.  To prepare the marinade:  I threw everything into my trusty pestle and mortar (which I LOVE!  We have the granite Avanti one) and just mashed it all up.  You will end up with a lovely red marinade.  At least this way you won’t have bits of burnt garlic or uneven flavours.

However, if you don’t have one just mix it together as best as possible.  Marinate the meat side (not the skin side!) with the lovely red marinade and make sure you get it into the cracks of the meat.  Do not get any marinade unto the skin side as you want to keep it nice and dry.

5.  Pop it into the fridge to marinate for about 2 hours or more – minimum 2 hours.  (Place it on a big plate and cover it with glad wrap.  At first I didn’t, but then found the idea so gross to have a piece of meat just sitting in the fridge and all the smells oozing everywhere!

6.  Once ready to bake it, take the meat out from the fridge and rub the sea salt all over the skin side.

7.  Then brush the white vinegar all over the skin side.

8.  Bake on the meat side up in the pre heated convection oven at 225C for 20 minutes .

9.  Turn over with the skin side up and bake at 250C for another 25 – 30 minutes. It should splatter and bubbly looking fats should appear on skin. It should start to dry out.

10.  Remove from oven and let the roast pork rest for about 15 minutes before chopping it up. (We had to use the good old chinese chopper to do this!)
I made a nice gravy with the drippings from the roast pork (yes sooo fatty but delicious as it has all the yummy nam yee and garlic flavours), added a bit of water and sugar and heated it over the stove.  Spoon off the layer of oil before serving the gravy with the crispy roast pork.  So delicious over rice and equally delicious just by itself!!! 🙂

Asian style Sweet Buns with Japanese Tuna Mayo

28 Feb


For many years, I have shied away from baking bread.  It never really appealed to me, to be honest.  It just seemed too hard.  Besides the fact that I really REALLY dislike kneading, it just seemed like one of those things that you couldn’t control or predict!  I had to do it during my cake decorating class, and really did not enjoy it at all!  I think it could also be due to my lack of success in baking scones in the early days!  So when I think bread, I think knead! Therefore, it was just something that didn’t interest me!  However, everything changed last a few weeks ago!  Whilst browsing through the numerous blogs that I keep track of, I came across this delicious Pineapple bun recipe on Pig Pig’s Corner.  Suddenly I was inspired!  I figured it was worth a shot!  So I spent the entire week researching, reading perhaps nearly every blog entry on Asian bread rolls I could find on Google to see what people found easy, hard, what they failed in and how to make sure my attempt would not be a waste and forever scare me off baking bread!

Whilst I didn’t get round to making the Pineapple Bun (but I definitely will later!) as I didn’t get time to do the preparation the night before, and I wanted to bake this on Saturday, I found another recipe… and trust me, if you think you can’t bake bread, have another go!  I hope you find some good success like I did!  It turned out really quite yummy – and almost as good as the ones you get at the Asian bakery.  Slightly sweet, soft and a closely knitted crumb, and the next day, it was still soft!  If you want it a little softer the next day, just microwave it ever so slightly.
So hope you enjoy the recipe and find the tips useful (which I have added in from my experience in making this a few times in the past few weeks, so I can say for sure that this recipe works!, together with those that I picked up from House of Annie’s blog)! 

I made plain buns with the extra dough!

 

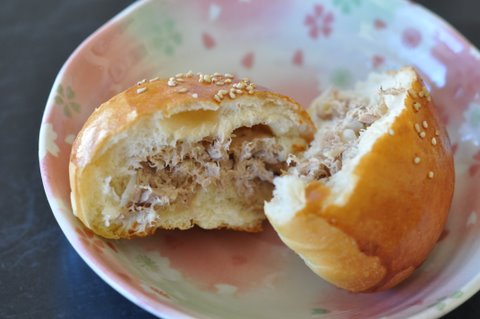
Look at that texture! Soft & fluffy (and not airy!!!) It nearly brought a tear to my eye!!!

 
Sweet Buns with Japanese Tuna Mayo

(Sweet Bun recipe below taken from the House of Annie’s Red Bean Paste Buns, which was adapted from Alex Goh’s “World of Bread”)
 

Sweet Bun Ingredients:
(A)
480g Bread Flour
120g All Purpose Flour
110g sugar (I used Caster Sugar as it is finer)
10g salt
20g Milk Powder
4 tsps Instant Yeast

(B)
1 Egg
300 ml Cold Water

(C)
60g Butter

Japanese Tuna Mayo Filling
(No quantity specified – it’s really up to you!)
Canned Tuna
Freshly chopped onion
Japanese Mayonaise
Freshly cracked pepper
 
 Method:

1. Mix (A) till well blended (I just mixed it with a whisk).

2. Add (B) and knead on your mixer with hook attachment until it forms a dough. I add the egg and then turn the mixer on slow and drizzle the water in slowly as it is mixing. (I actually had this going for about 5mins before realising that I had to add in the butter!  The mixture is actually really tough at this point, so I had started to wonder what was wrong with the recipe! So glad the extra mixing didn’t seem to make too much of a difference!)

3. Add (C) and continue to knead to form a smooth and elastic dough, about 10 minutes on my Kenwood on 2-3 speed (with breaks when the motor got hot).  I actually ended up stopping it every 2 mins or so – at the same time, realigning the machine.  I really thought my Kenwood was about to have a heart attack as it kneaded the dough – no kidding!  The machine MOVES along the bench as well – so make sure you keep an eye on it at all times… you certainly don’t want the machine walking off your kitchen bench!

Dough is ready when you can “windowpane” it – pick up a bit of the dough and see if you can pull it without breaking the dough (check out the recipe at House of Annie for her picture).  Another trick I read is to poke a hole in the piece of stretched dough.  If you can poke a round hole, it’s ready.
4. Gather dough into a ball and place in a bowl that has been oiled. Flip dough around to oil the entire dough (this is really helpful!  So make sure you do it!  If your bowl is not that large and the dough expands and touches your plastic wrap, you won’t get the dough sticking everywhere!  It actually also helps with Step 5). Cover with plastic wrap and let rest for about 50-60 minutes or till it doubles in size.  I actually put the bowl of dough near the sliding door as the sun was shining through the windows –
If you are having trouble getting it to double, here’s a couple of tips:

  • (1) Fill a small bowl with water and microwave on high for about 1 minute. Move bowl to corner and sit your dough in the hot steamy microwave (with the door closed, of course) for the resting time. That should do the trick! (This is the trick from House of Annie)
  • (2) Another trick I have read somewhere which I tried is to boil some water, and put it into a container and place it in the oven, and put your dough in with the oven closed.  I actually used this trick in Step 6 when the weather started to cool and the dough did not seem to be proving well).  Important note here – do not feel tempted to speed up the process and preheat the oven! A big NO NO! I tried this once and my dough turned out really tough! 😦 Result – tight and tough dough! It still looked good but when you ate it you would know it was’t fluffy!

5. Once dough has doubled, divide the dough into small balls into 55-60g portions (I got about 17 buns from this). Rest for 10 mins, and then fill it with the tuna mayo mix by flattening the balls (I used a small rolling pin), put the tuna mix in the center and gather the dough around the paste and pinch to close.  I like to gather the sides up and twist them like you would imagine twisting a chinese pork bun to get the crease).  Also – to make sure your filling is in the middle and not at the top of the bun, make the centre of your flattened piece of dough a bit thicker than the sides!  Make sure you pinch the sides well together to ensure the filling is nicely packed in.
Flip over and put the pinched part on the bottom of the parchment lined tray (make sure to space them a few inches apart).

6. Once all the buns are done, cover loosely with plastic wrap and let it proof for another 50-60 minutes or until doubled in size.  (the weather wasn’t terribly warm or humid yesterday, so it was actually a bit tricky to get it doubling in size, so I ended up using Step 4(2) – but I also turned on the oven slightly to get the oven slightly warm).  The important point here is that the bread MUST be DOUBLED IN SIZE.  I ended up taking ages to proof it, much longer than the 50-60mins as the weather had cooled down by the time I was at this step.  So to quicken it up I used Step 4(2) after I realised the bread had not changed much after 40mins.  By the way, you can also tell if the bread has been proofed enough when you hold it – it should feel quite light & airy!  Not heavy & dense like a piece of dough!

7. About the last 10 mins of proofing, preheat the oven 170 degrees.  Beat one egg and brush the buns gently with eggwash. I sprinkled some toasted sesame seeds on the bun.  (How to check that the buns are sufficiently proofed is to actually feel the weight of the bun.  I noticed those that had been proved enough was lighter – practically the weight you would expected the cooked bun to feel like.  Those that still seemed rather dense and heavy, I placed back into the oven to proof).

8. Bake in the oven for 12-15 mins or until golden brown on top (depending on your oven… but it took me about 12mins to get the nice golden brown top!)

9.  Once the buns were out of the oven, I brushed the tops with some melted butter to get it looking a bit shiny!

 
If using the bread machine…

Pretty much the same except your bread machine will knead it very very silently for you (vs the kenwood which sounds as if it is about to have a heart attack!) – and it you’ll knead to need it for about 10mins as well in the machine.  Best test is the windowpane test – and also when your dough is smooth and not sticky and elastic! 

If you do try this, let me know!!! 🙂 This is my favourite recipe so far – over the weekend I tried the infamous Tangzhong method… sadly… it was not as good! I need to find out why, as everyone raves about this method of producing soft & fluffy buns that still nice and soft for days! So did not happen for me! 😦

Jjajangmyun (Korean blackbean noodles)

27 Jan

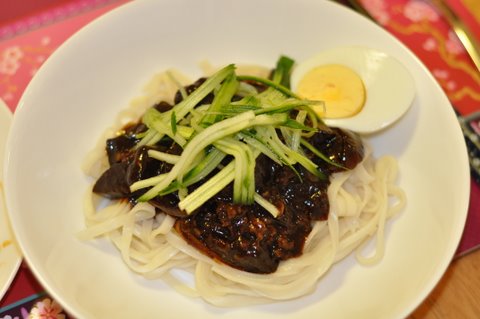
For those of you who are Korean drama serial fans, you will no doubt have seen the characters hungrily slurp up these very black noodles at least once!  It always looks so delicious that I had to give it a go!  I have cooked it about 3-4 times now!  It’s a little different to what your chinese palette might imagine it to be – it’s not as salty as it looks, but it doesnt have a heap of flavour to tell you the truth! Pretty much soya sauce bean flavour 🙂 However, the dish comes alive much more once you top it with freshly sliced cucumber!  In the picture above, it was sliced very thinly without the seed part of the cucumber – however, I actually find that if you include the seed part of the cucumber (ie slice the whole thing) – it’s actually much nicer.  It totally freshens up this otherwise fairly dull flavoured dish!  You also need half a boiled egg to go with this dish! 🙂

This dish is SOOO easy to make – seriously, you just pretty much fry up some onion and you can then fry up the paste and then add in your minced pork (minced chicken is okay too!), zucchini and water.  There are no strict rules really – I’ve added in the black bean paste after cooking the meat as well, and it works just fine.  I notice quite a few recipes get you to fry up the paste separately first – I could not be bothered to do so, and I think it tastes just fine! 🙂  Finally, add some cornflour mixed with water to thicken up the gravy.  Let it simmer for a bit and you’re done!  Add salt and sugar to taste. 

If you’re interested to see the video on how to make this dish, check out Maangchi’s blog entry

The chinese have a version of this noodle – called Zha Jiang Mian.  Apparently, this dish was started by the chinese .  However, I have yet to taste the chinese version, so I’m not quite sure what the difference in flavour would be! 🙂

By the way, I’ve discovered that if you have run out of the Korean bean paste, or rather don’t have enough of it, you can add a bit of miso paste to increase the dept of flavour and add in the dark caramel soya sauce 🙂  It’s not a bad rescue tip!!!

Dried Korean Noodles - simply boil it up till al dente!


Korean Black Bean Paste


And you can always cook up a big batch, and freeze the sauce for those lazy nights where you really don’t fancy cooking! 🙂 (I have 2 tubs of the cooked sauce in my freezer right now! :))

Enjoy!!! 🙂

A Fine Date in Fremantle

16 Jan

Saturday was perfect date day, and perfect date weather.  It has become increasingly difficult to get some what I like to call “us time!”.  We are always so busy with friends and family (which we love and couldn’t imagine not having!), and daily living, that it has to be quite the conscious effort to have a date 🙂

Walking around Fremantle brought back fond memories of our pre-wedding shoot (see above) – seemed like just yesterday that we were there!!! 🙂

I had cleared the weekend to study (*confession – it did not happen!) – so our diary was free – 🙂  Waking up on Saturday morning to absolutely gorgeous Western Australian weather, we decided to seize the free Saturday we had and go out for lunch!  A came up with the idea of having lunch in Fremantle – for some good old Fish & Chips.  It had been so long since we had this totally sinful & guilty but delicious treat.

Yummmmm………….. freshly and delicately fried – the fish just flaked so perfectly, and the squid rings so tender.  It was really delicious and we decided that next time, we would just order the fish and chips.  The fish was deliciouz and tender, but the portions were quite small (I think it was about $12.50) – the fish slices were fairly thin 😦
Seafood Chower - so rich and filled with chunks of fish! $8.50


Natural Oysters - rather small & not that tasty! Rather disappointing! $25 for a dozen.


Mediterranean BBQ Squid + Salad = $19 (Pretty yummy! Definitely the healthy option - but I think rather overpriced)


We then took a nice slow walk around the streets of Fremantle towards the markets.  It has been a really long time that we wandered through the markets – although rather small, it was cosy, and the fruit market had a wide selection… including this Ostrich Egg!!!  It was SO big – at first I thought it was a honeydew!!!

We ended the afternoon with a really good cup of coffee at Gino’s.  I would rate the coffee 9/10 – despite the lemon faced barista!  It was so smooth and creamy (and I had a skinny flat white! Imagine if it was full milk!) – and so easy to drink…. I would definitely recommend stopping here for a cup of coffee!!!

To be honest, many a times I have wished to live in a glamarous and “happening” city like London and in Europe – where everything seems so cool, so historical and just so interesting – as if every corner you turn, you’re turning a page of a good novel.  However, this year I have decided that rather than wishing, is to enjoy every present moment and to make it count!  Walking in Fremantle and enjoying such beautiful blue skies, soft winds and the warm sun, with a wonderful husband, reminded me how blessed I was to live in this rather, if I may say so, perfect city!!! 🙂  What else could I really wish for! 🙂

Hainanese Chicken Rice

16 Jan

If there was a dish that one couldn’t never be tired of, nor eat enough rice, it would be the famous Hainanese Chicken Rice.  This is so popular in Singapore, that it is often referred to as their National Dish, and even has a spot on the Singapore Airlines’ menu.  I love this dish.  The succulent, silky smooth chicken (minus the skin, I can never bring myself to eat that!), with the grainy, al dante fragrant chicken rice is one of the most complete meals.  It never fails to satisfy!

Last weekend, as we passed by the butcher, and saw Mt Barker Free Range chickens, I thought of making a steamed herbal chicken for dinner that night.  However, as it would happen (actually quite a lot!), I changed my mind and decided to attempt to make chicken rice.  I had made it once years ago, and never since we got married.  I have a phobia of chopping chickens.  I have a phobia of handling whole birds or fishes.  To be honest, I kinda screamed when I saw half of the neck tucked neatly inside the bird.  The bird was like a baby of some sort – I know this sounds gross, but yeah I was really quite grossed out.  When I prepared the turkey for christmas, I told A I could possibly turn vegetarian at this rate (hahaha!!!) – I freaked out as well.  I have a bit of a phobia of chopping as I somehow think I might miss and chop my finger instead – haha!  Anyway, but let me assure you, the chicken itself was really clean – phew!!!

Not knowing how to exactly chop the chicken, Adrian and I somehow navigated ourselves around (hence you see the chop is not neat!) – but since it was for ourselves, we didn’t mind!

I referred to Steamy Kitchen’s Hainanese Chicken Rice post, but as it normally happens, I tweaked the recipe and did my own thing. 

To add that special touch and dimension to your chicken rice, make this simple but deliciouz ginger and spring onion condiment.  I basically tossed into a blender some ginger, spring onions, sesame oil, sugar and a dash of salt and sugar.  Trust me, it will complete your meal! 🙂

I pretty much followed Steamy Kitchen’s recipe and fried the rice before cooking it in the rice cooker.  The aroma that fills your kitchen is just so incredible – you’ll drool before your first spoonful of rice!  Remember not to add too much water – I did the ratio of 1 cup of rice to 1 cup of chicken stock (don’t forget your rice would have retained some of the water whilst it was soaking).  It was perfect – al dente!

For all that effort, make sure you make a heap of rice and chicken – it’s still yummy to eat for the next couple of days !!! 🙂

Mini Smoked Salmon + Dill Quiches

4 Jan

Happy New Year! 🙂 

 Hope you all had a relaxing and happy break – A & I had a lovely time relaxing, eating and hanging out with family and friends- despite having to work in between the Christmas and New Year public holidays.  It was lovely to go for breakfast/brunch with friends, to have a Christmas dinner with 20 family and friends, even to clean and reorganise our room yesterday (and vacuum and clean the bathroom! hahaha!)  and watch many hours of Korean drama 🙂 

Who doesnt love a little luxury here and then!  Smoked salmon in anything and everything is DELICIOUS! 🙂  The best thing about these mini smoked salmon quiches are that they are wonderfully easy to make, they look divine and taste like a treat too!  These would be perfect for a canape or tea party!  I just baked these at 9.30pm tonight and the house smells so yummy! (thank God for aircon – as it is a very warm day in Perth today!)

I spent a bit of time researching on a quiche recipe (before realising there was a recipe at the back of the packet of shredded tasty cheese!) – as some had milk, some had evaporated milk and some had cream!  In the end, I realise quiches recipes are very forgiving!  You can’t really go too wrong!  Just be careful you don’t add too much salt as cheese and salmon are very both salty enough! (infact I didnt add any salt in the quiche!)

So this is my recipe – but feel free to modify as you please! 🙂

Ingredients (Makes approx 24 mini quiches)

  • 3 sheets of Puff Pastry
  • 3 eggs
  • 3/4 cup cream
  • Approx 1/4-1/3 cup full cream milk
  • 100g smoked salmon (I only had one pkt of it – but you could put more if you like!)
  • 1 cup shredded cheese
  • 1 chopped onion
  • Freshly ground black pepper to taste
  • Fresh dill to decorate


Method

  1. Pre heat your oven to about 170-180 degrees
  2. I used my muffin trays – cut out a circle of puff pastry and line each “muffin” circle with the pastry
  3. Whisk together the eggs, cream, milk & pepper in a jug
  4. Place some smoked salmon, chopped onion, shredded cheese and dill in each “muffin”
  5. Pour some of the egg mixture into the “muffin” and bake in oven till golden brown (approx 15-20mins from memory! hmm)
  6. You’ll see it rise and bubble, but once it is out of the oven and cools down, it sinks and looks like a mini quiche!

Hope you enjoy it!  You can substitute the smoked salmon with bacon or anything else you fancy!

Takoyaki Balls

19 Oct

So sooo good... 🙂

Whenever I am in Singapore, and no matter how full I may be, I have to buy at least one round of these golden, yummy takoyaki balls!  These are one of the snacks I miss most.  So to my utter delight, at JL’s awesome 30th party last friday, good friend and martha-stewart extradionaire, ED made these takoyaki balls! I gasped! I clapped! I HAD to know how to make it! 🙂  The impossible snack had suddenly become oh-so-accessible! 🙂

We found these machines at Target (called Dutch Pancake Maker) today so after work, we madly tried to find a chinese shop.  It was so insane, I could not believe we were driving around Canningvale trying to find a chinese shop.  Googled around and rang a mobile number, and he called back and said he was closed but we could come and buy the groceries! I felt like crazy woman!  It wasn’t that the craving was strong, but we were on a mission! 🙂  I felt quite embarrassed indeed! 🙂 Lucky it turned out good! And now I have found another nearby chinese shop! 🙂

So what are takoyaki balls?  According to Wiki, Takoyaki (たこ焼き or 蛸焼?) (literally fried or grilled octopus) is a popular Japanese dumpling made of batter, diced or whole baby octopus, tempura scraps (tenkasu), pickled ginger, and green onion, topped with okonomiyaki sauce, ponzu, mayonnaise, green laver (aonori), and katsuobushi (fish shavings),

I found a good guide on how to make it at Lunch in a Box’s blog.  She shows you the step by step guide on how to make it and even shows you what she uses! 🙂 

Recipe:  (taken from Lunch in a Box)

Batter:

  • 4/5 cup (100g) prepackaged takoyaki mix. If unavailable, substitute a scant 4/5 cup (90g) flour, 1 tsp (5g) instant hondashi granules (bonito stock), 3/4 tsp (3g) grated “nagaimo” mountain yam (optional, but fabulous for tender texture), and 1/4 tsp (1g) baking powder
  • 340cc cold water (a scant 1 & 1/2 cups)
  • 1 large egg

For the filling:

  • 1/4 lb (120g) cooked octopus (Japanese prefer the tentacles), cut into 1/2″ or bite-sized dice (NOTE: If you like, you can substitute other things for the octopus such as cheese, chicken, pork, squid, anko — bean paste, etc.)
  • 1/2 cup (18g) tenkasu (crunchy fried tempura batter bits — if unavailable, use Rice Krispies)
  • 1 Tb (6g) beni shoga (red pickled ginger), chopped
  • one half green onion, chopped (a.k.a. scallion, spring onion)

For the topping:

  • takoyaki sauce (or substitute okonomiyaki sauce, yakisoba sauce, or even tonkatsu sauce)
  • aonori (seaweed flakes)
  • katsuobushi (bonito flakes)
  • mayonnaise (Optional: I like Japanese Kewpie mayonnaise, but any standard mayo in a squeeze bottle will work.)
  1. Make the batter by whisking together the mix and water well, then beating in the egg. (If not using a mix, grate the nagaimo on the finest holes of a box grater, combine with the water, flour, hondashi and baking powder.) Set aside.
  2. In a medium bowl, mix together the tenkasu, benishoga and green onion. Keep octopus at hand.
  3. If using a nonstick takoyaki pan, heat the pan first, then oil the surface with cooking oil spray, an oil brush or a folded paper towel dipped in vegetable oil. (If using cast iron, oil the pan first, then heat over medium heat.) Follow the steps in the tutorial below to cook. These can be flash-frozen on a metal pan in the freezer, then transferred to a plastic freezer bag for longer-term storage.


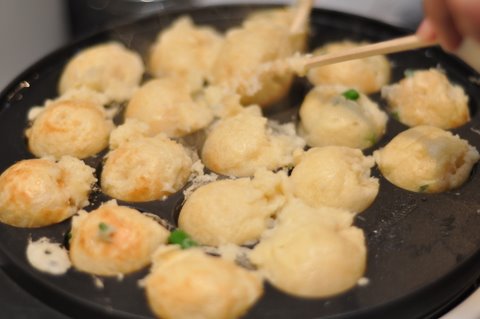
To make your takoyaki balls nice and big and round, make sure you overfill each little hole! Dont worry if it looks messy!


Start turning after about 3mins!

ED warns that at first it looks totally messy, gross and you think you have just ruined the whole batch! But what is so wonderful about these tako balls is that you can’t stuff it up!  It’s actually better to overfill them, and as they cook and as you rotate them, you tuck the batter into each ball!  In the end, they just end up mixing together and forming a ball! Easy! 🙂

Wooden chopsticks are best to turn over these golden balls!


The machine is actually the Dutch Pancake Maker (Mistral brand) - introduced by ED! Thanks!!!


All ready!


Drizzle on some takoyaki sauce (or tonkatsu sauce), japanese mayonaise and bonita flakes (I only found shavings this time!) – you can also put seaweed on it! Eat it whilst it’s hot! (it deflates as it cools!) – super duper delicious meal!  That’s what we had for dinner tonight! 🙂

Creamy Smoked Salmon Pasta

17 Oct

I often struggle to include fish in our diet!  Not that we don’t like to eat fish.  For those who know me, know I have an aversion to really fishy fish, the stink of raw fish and the lack of knowledge on how to prepare fish without fainting from the smell of it! 

So when I saw a nice piece of smoked salmon fillet, all vacuum packed in Woolies, it was the perfect type of fish for me!  Plus the fact it was smoked, stinky factor totally decreases! 🙂 *YAY!*

I used thie new range of cream cheese for cooking produced by Philadelphia.  However, I have to admit that it doesn’t taste as good as the real pure cream – it has a bit of a slight sour taste to it, as you would expect with cream cheese.  But the wonderful thing about it, is that it is very flexible, it doesn’t curdle and you can let it happily simmer and bubble and it doesn’t split!

There’s no real recipe or this, I just kinda sauted some crushed garlic and red onion, threw in the cream and smoked salmon and added salt and pepper to taste.  I used fresh pasta this time, so once you have cooked it till al dente, just throw it into the sauce and mix it all up together, and garnish with some fresh parsley.  We drizzed some lemon juice over the top.

Verdict:  Lovely smoked salmon!!!  I love the firm texture.  I just flaked it with a fork. 

Cream … hmmm… didn’t quite like the slight tang to it… I would prefer the real cream but not keen on the fat content!!! :